A Basic Guide To Create Invisible Sound With Exciters
Imagine this: You are sitting in a café listening to your favorite music. But somehow it sounds different. The room is filled with music. It seems as if the music is coming from everywhere - from the front, from the side, from the back - but where are the speakers? You start to search - no speakers visible. It seems as if the music is coming from the walls and the cupboard door, but also from the ceiling and perhaps from the painting on the wall. Really? Can that be?
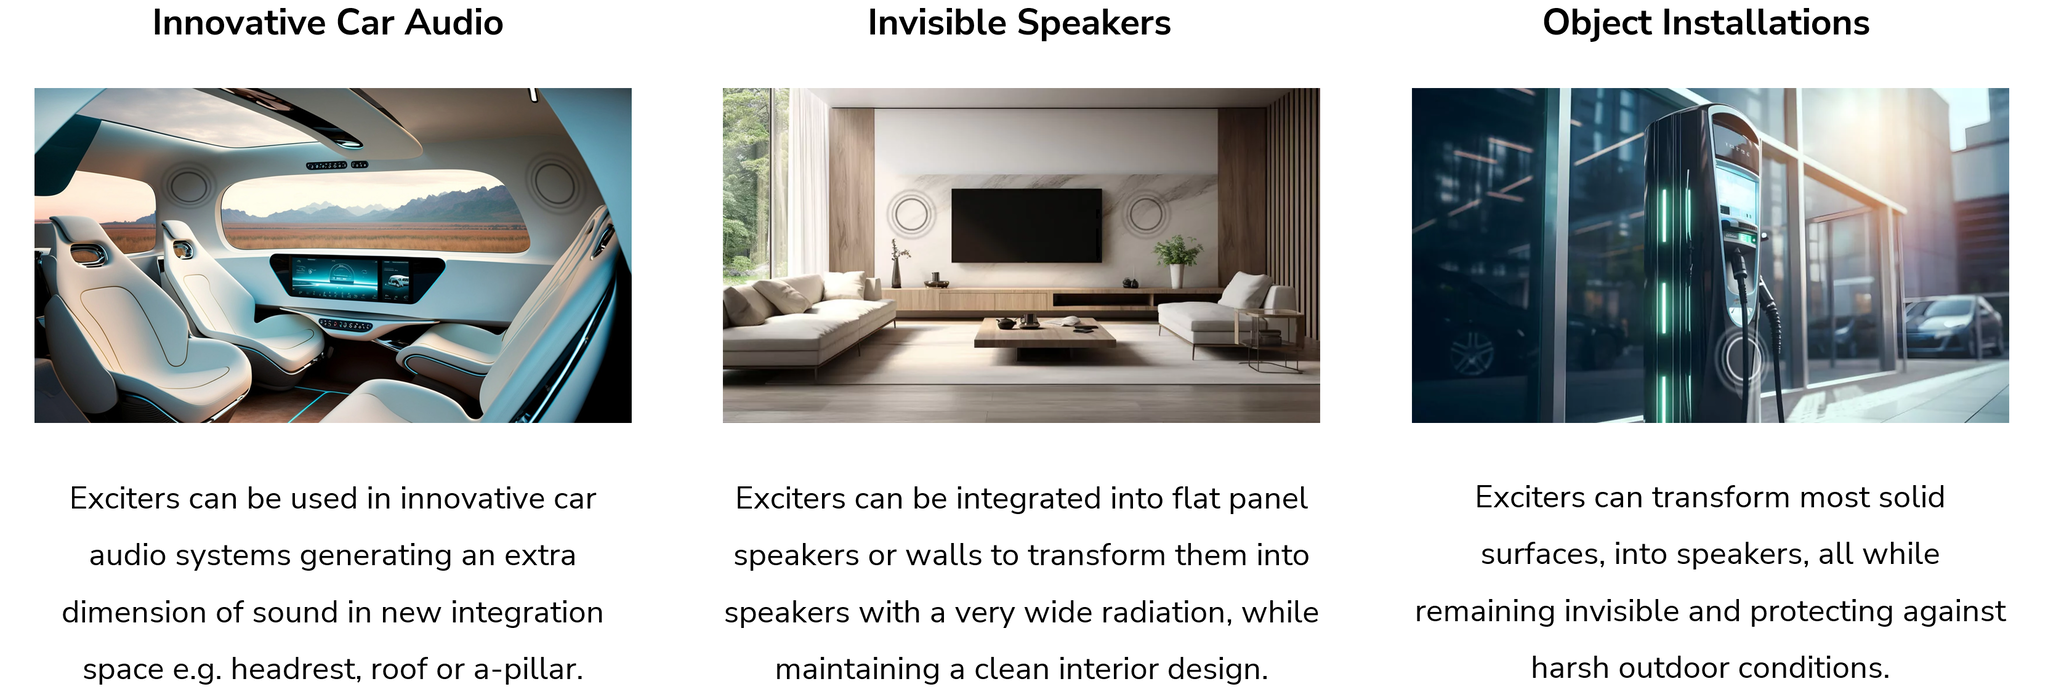
This is the power of exciters—devices that can transform ordinary surfaces like walls, furniture, and even windows into high-quality, invisible flat panel speakers. Whether you're looking to enhance your home theater, install audio in a minimalist space, or add sound to innovative product designs, exciters offer a creative and seamless solution. You may have already experienced this technology in places like car audio systems, retail displays, high-end home theaters, or modern architectural installations, where sound seems to come from nowhere.
In this blog, we'll explore how exciters work, the materials needed, and practical steps to create your own invisible sound system. Let’s dive into the world of exciters and discover how to turn ordinary surfaces into extraordinary speakers!

What do I need to get started?
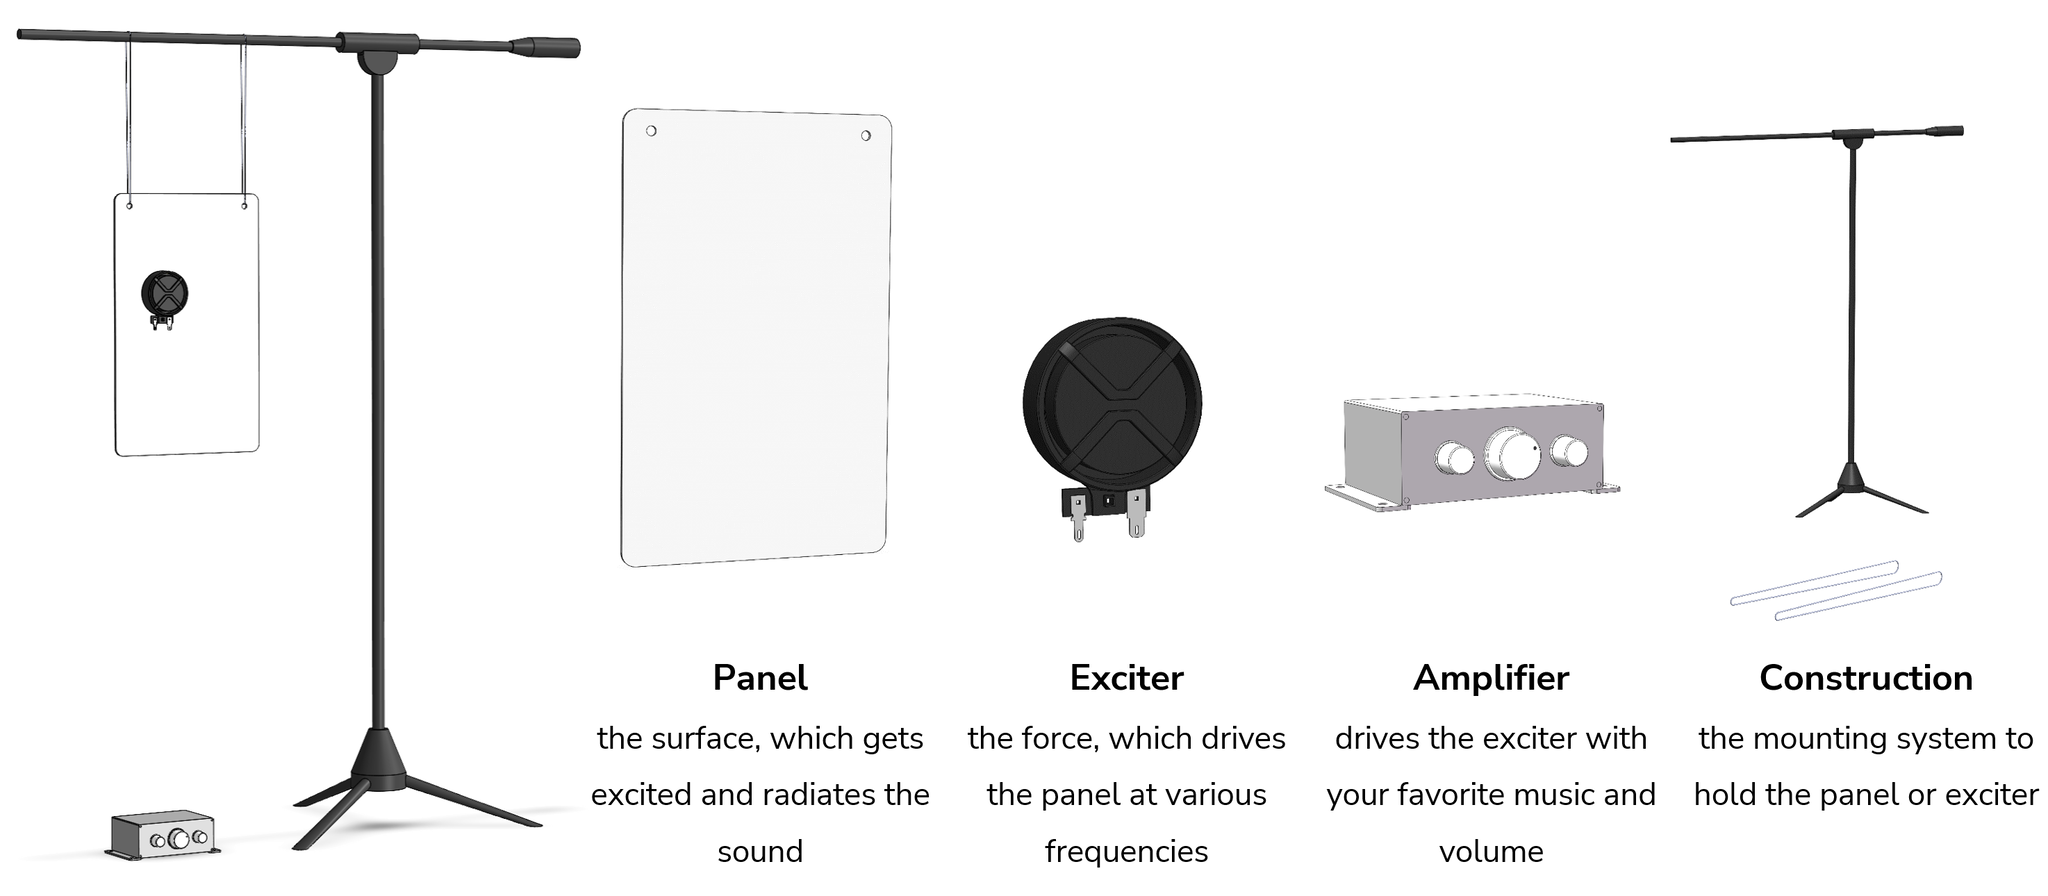
It's easier to get started than you think! You only need a few components:

Once you have everything, you're ready for the "wow" effect. You might wonder, "How can such a simple construction sound so great?" or "What happens if I change the exciter position or use different materials?" There are many important questions, but before we explore the possibilities, let's zoom out and consider the system as a whole.
Each component within the system—be it the exciter, the panel or the construction—plays a critical role. The overall speaker quality can be thought of as the product of these individual ratings and the effectiveness is determined by the weakest link. Understanding the properties of each component allows for better design and implementation of a panel speaker system.
1. What is an exciter and how do they work?
An exciter is essentially a loudspeaker minus the conventional frame and cone. It operates by vibrating a surface to produce sound, bypassing the need for visible speaker components. This mechanism allows for a wide range of creative applications, especially in spaces where traditional speakers are impractical due to aesthetic or environmental concerns.
Choosing the best exciter for your application
There is a diverse array of exciters available, each suited to different applications. From coin-sized exciters ideal for compact spaces to powerful models designed for larger scale applications, the choice of exciter depends on factors like the size of the surface, the desired volume, and specific use cases. For instance, bone conducting exciters are perfect for creating personal audio experiences without traditional earphones, while high-power models are tailored for more robust sound requirements.

Example: Comparison of two different exciters

Figure 1: Comparison between a Coin Type Exciter (blue) and a High-Power Exciter (yellow) mounted on a Mineral Panel with 0.3m² size and measured in 1m distance with 2V (1W) input.
Figure 1 illustrates the performance differences between two exciters mounted on the same panel. The High-Power exciter has larger sensitivity, more low frequency output, however, it is limited to highest frequencies. Here the smaller exciter performs better. It is very much depending on your personal needs. If you need maximum output – the High-Power exciter is the better choice, but needs to be combined with another High-Power exciter to get the full frequency range. The Coin-Type exciter is a good choice, when only little space is available, low maximum volume and less low frequencies are required – e.g. when a subwoofer is available.
Exciter takeaways:
- High-power exciters offer greater sensitivity due to larger, higher-grade magnets - doubling the force factor Bl with the same resistance yields +6dB more output at the same power
- Smaller exciters generally have less sensitivity but improve high-frequency response thanks to lower inductance and moving mass
- The exciter’s suspension may limit low-frequency output, so check the magnet resonance frequency in the datasheet
- For a full-range response, use a full-range exciter, combine large and small diameter exciters on the same panel or combine exciters with an external woofer
High-Power exciters | Extended Mount exciters | Coin Type exciters |
2. How do I select the best panel for my application?
The performance of an exciter is greatly influenced by the characteristics of the mounting surface - the panel. Adding an exciter to a metal panel will produce a metallic sound that doesn't sound natural. Adding an exciter to a thin wood panel, such as balsa, will produce a very natural sound. You can simply knock on a material to estimate the potential sound - your finger bone is like an exciter. Materials such as lightweight composites are excellent for high fidelity sound, while softer materials such as soft foam boards may not produce the same clarity. Last tip: a material that is 50% lighter can produce +6dB more output. An upcoming blog will delve into this topic and show you the differences in performance.
Example: Comparison of two different panels
Figure 2 shows a comparison between an Acrylic Panel e.g. like plexiglass and a construction foam panel. It can be seen that the acrylic panel is extended to lowest and highest frequencies, while reducing the peaks due to high internal damping. The construction foam panel is slightly lighter and has in average more output, but it is limited to highest frequencies and also too stiff for the chosen construction, which limits the low frequency output.

Figure 2: Comparison between an Acrylic Panel (blue) and a Construction Panel (yellow) with a size of 0.3m² size with fixed edges and measured in 1m distance with 2V (1W) Input.
Panel takeaways:
- Use a light panel - reducing the panel mass by 50% increases sensitivity by +6dB.
- Make the panel dimensions in length and width unsymmetrical
- Larger panels tend to have more bass and a flatter frequency response due to higher modal density, Smaller panels enhance high frequencies.
- Explore the sound of different materials. Knocking a panel provides an impression of the overall sound, as your finger acts like a “full-range” exciter. Slightly damped materials are preferred.
3. How and where to install the exciters and the panel?
Mounting an exciter is straightforward: it typically involves an adhesive ring or mounting plate that securely attaches the exciter to your chosen surface. The type of surface plays a crucial role in the quality of sound produced. Think about, how you want to fix the panel or the exciters. The panel can be simply hanging, or fixed on a frame or softly fixed with foam on a frame. Furthermore, the whole exciter can hold the panel as well. There are various constructions. Placement is also key—the position of the exciter has a strong influence due to the driven modes, see Figure 3, which compares two different excitation positions. The position influence is especially at low frequencies - for high frequencies the difference becoming negligible. In this case position x1=30%, y1=50% has less deviations in the frequency response, especially between 100Hz and 200Hz. Often a non-symmetrical position around the center is the best position.
Example 3: Position influence

Figure 3: Comparison between two different excitation positions: x1=30%, y1=50% (blue) and a x2=50%, y2=50% (yellow). Measured on a mineral panel with the size = 0.3m², Ratio = 2 and fixed edges. Measured in 1m distance with 2V (1W) input.
Construction takeaways:
- Position exciters off-center; experiment with locations using a microphone and double-sided tape to find the flattest frequency response
- The edge boundary conditions greatly influence the needed panel material, so consider whether edges are fixed or free
- For free edges, use a thicker lightweight panel to take advantage of piston-like movement
- For fixed edges, use a larger or thinner panel to lower the first eigenmode
4. Which amplifier should I use and how do I wire exciters?
To maximize the potential of exciters, pairing them with the appropriate amplifier is crucial. Most exciters are compatible with standard audio amplifiers, but understanding the load capacity and impedance compatibility is essential to prevent damage and ensure optimal performance. It is recommended to use Amplifiers with at least low and high frequency adjustments. The optimized way is to have an integrated DSP with different types of filters, which allows to minimizes peaks and dips in the frequency response, shelve frequency ranges or boost low/high frequencies. To get the most from your set up DSP is key.
Recommended amplifiers | Recommended DSP amps |
Wiring techniques for optimal sound
Effective wiring is fundamental to exciter performance. Exciters can be wired in series or parallel configurations depending on the desired impedance and the amplifier’s specifications. Properly managing the wiring setup ensures that the exciters perform efficiently without overloading the amplifier, maintaining sound quality and system integrity. The target should be in the range between 4Ohm and 8Ohm, which is the best load for most amplifiers. If you can realize a 4Ohm and 8Ohm configuration, the 4Ohm configuration is the better choice for most cases.

5. Start your own journey to invisible sound
Exciters open up endless possibilities for sound integration into everyday objects. Whether you want to hide speakers in a sleek home design or create interactive sound in public installations, exciters are your gateway to invisible audio.
By choosing the right exciter, pairing it with the appropriate surface, and experimenting with placement, you can build a wonderful sound system that is not only powerful but invisible. So get started today—turn your walls, furniture, or even your car into a sound source and explore the magic of invisible sound!
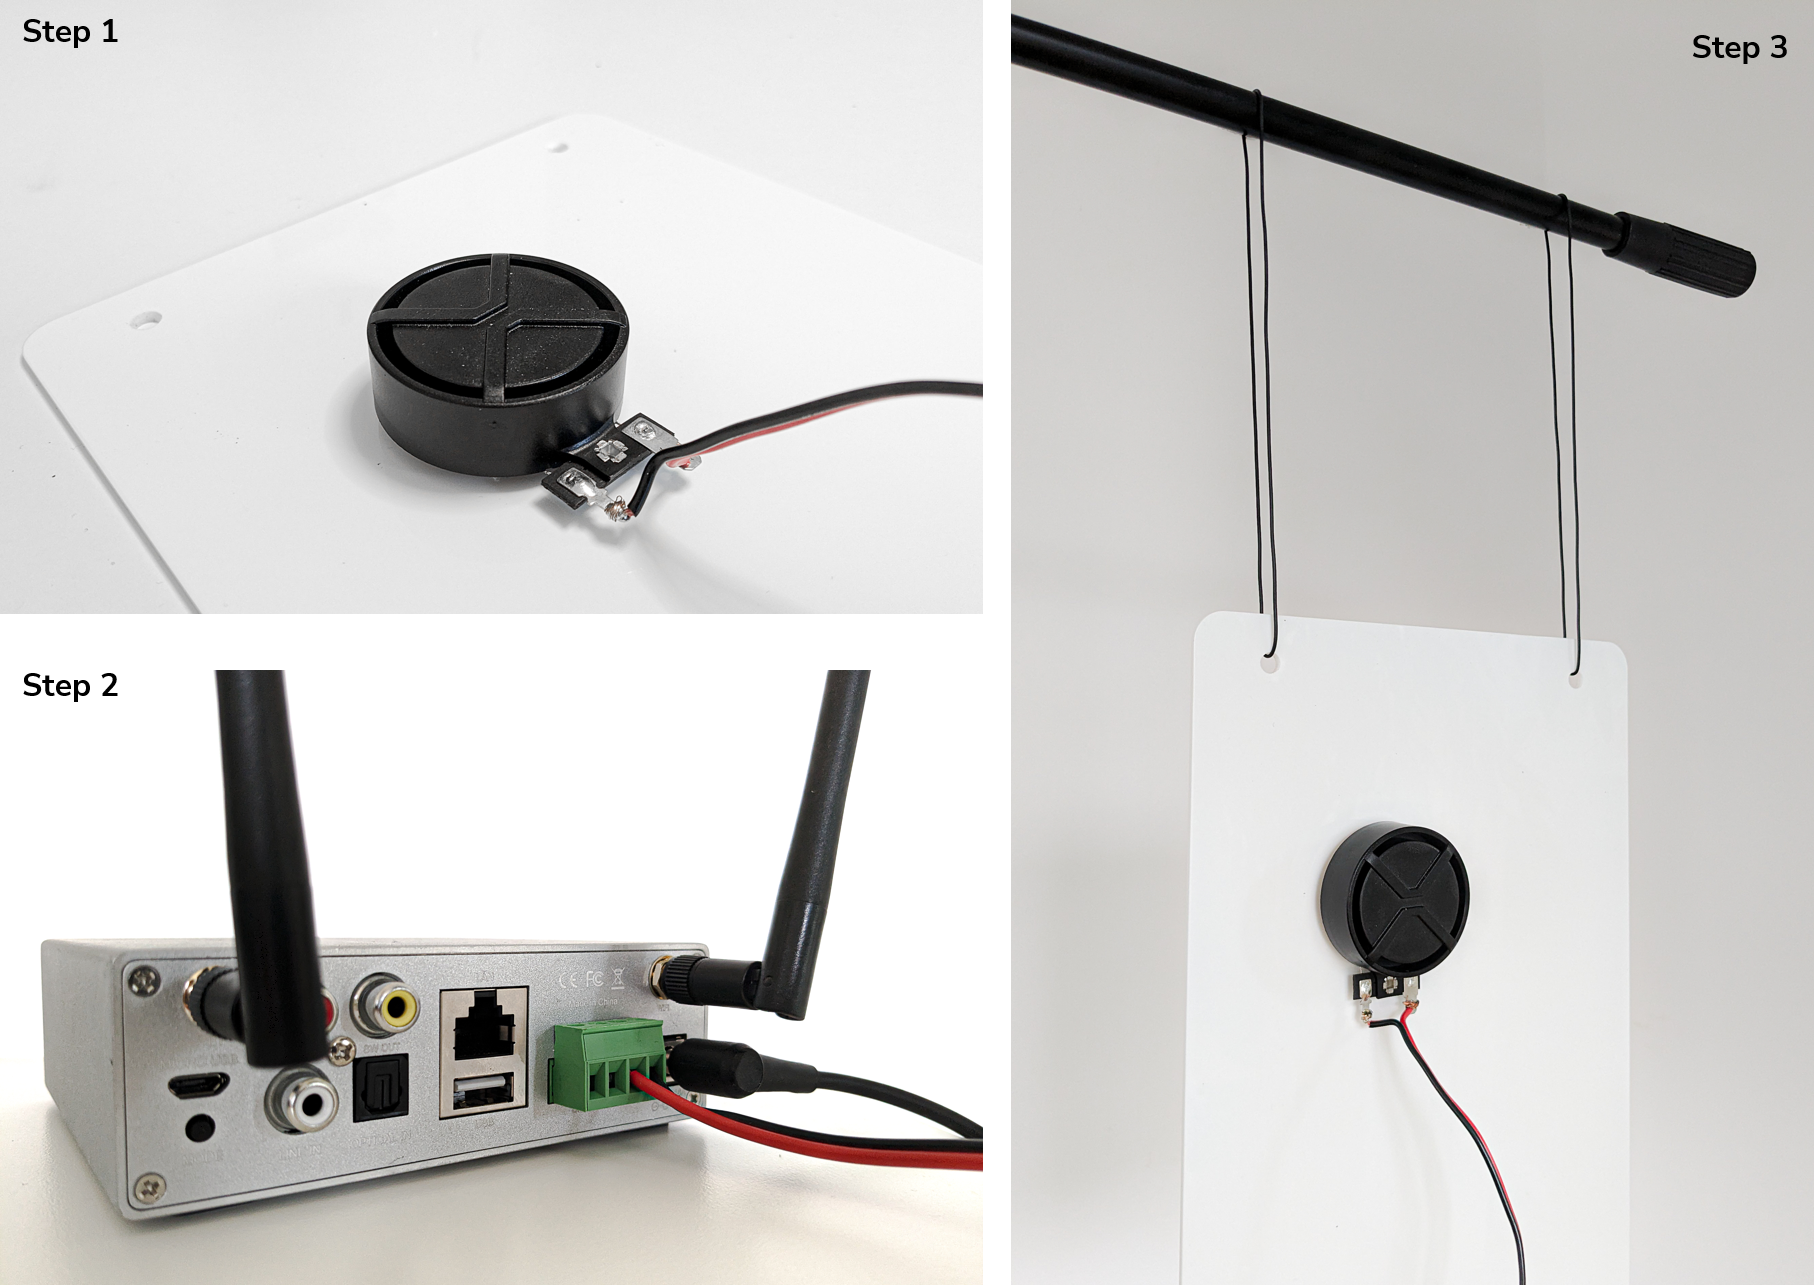
Simple three steps to get started!
- Step 1: Solder the exciters and place exciter off-center (Right: + Channel, Left: - Channel)
- Step 2: Wire exciters to the amplifier and add the power connector (Red: + Channel Black: - Channel)
- Step 3: Hang the panel to a stand and enjoy the magic of panel speakers

Components used in the example above:
- Panels: 2x Acrylic (e.g. plexiglass) panels 250mm x 350mm x 3mm
- Exciters: 2x Xcite Xtreme XT32-4 (1x per panel)
- Alternative option: 4x Xcite Xtreme XT32-8 (2x per panel)
- Amplifier: Arylic A50+
- Wires: 2x0,75mm2 Red/Black
- Power supply: Huntkey 19V 4.74A 90W
Author's profile: Ben Zenker
Christian
Posted on tuesday 29 october 2024 13:54
Excellent initiative to published a guide about DML. DML can produce a unique pleasant sound in a room.
However as listed in this guide, the number of parameters is high so that the result can be excellent like it can be poor. It is the role of such guides to limit the trial and error loops.
As a DIY DML builder for some years now, I am pleased to read any information about DML but my expectation if for much more detailed and documented papers.
So excellent initiative but waiting for the next posts for a real engineering level.

 Home audio
  Audio components
  Crossover components
  Test & measurement
  DIY kits
  Accessories
  New products
  Speakers
 Amplifiers
 DAC converters
 DSP modules
 Turntables
 Streamers
 Woofers
 Tweeters
 Exciters
 Bass shakers
 Plate amplifiers
 Amplifier modules
 Single board computers
 Assembled crossovers
 Printed Circuit Boards (PCB)
 Capacitors
 Resistors
 Coils
Coils Circuit Breakers
 Crossover tools
 Screw terminals
 Acoustic measurements
 Electric measurements
 Sound level meters
 DIY amplifier kits
 DIY component packs
 DIY speaker kit
 DIY subwoofer kits
 DIY bluetooth speaker
 DIY electronics kits
 Binding posts
 Cabinet Hardware
 Cables
 Connectors
 Speaker cabinets
 Electromechanics
 Power supplies
 Speaker repair
 Workshop & tools
 Amplifier accessories
 Stands & mounts
 Gift voucher
 Books
Books New products


 Speakers
 Amplifiers
 DAC converters
 DSP modules
 Turntables
 Streamers
 Woofers
 Tweeters
 Exciters
 Bass shakers
 Plate amplifiers
 Amplifier modules
 Single board computers
 Assembled crossovers
 Printed Circuit Boards (PCB)
 Capacitors
 Resistors
 Coils
Coils Circuit Breakers
 Crossover tools
 Screw terminals
 Acoustic measurements
 Electric measurements
 Sound level meters
 DIY amplifier kits
 DIY component packs
 DIY speaker kit
 DIY subwoofer kits
 DIY bluetooth speaker
 DIY electronics kits
 Binding posts
 Cabinet Hardware
 Cables
 Connectors
 Speaker cabinets
 Electromechanics
 Power supplies
 Speaker repair
 Workshop & tools
 Amplifier accessories
 Stands & mounts
 Gift voucher
 Books
Books New products


